 Interfaces Gráficas de Usuario
Tabla de contenidos
.png) 1.
Sesión 2 (laboratorio): Interfaces Gráficas de Usuario
1.
Sesión 2 (laboratorio): Interfaces Gráficas de Usuario
 1.1.
Elementos pasivos en GUIs
1.1.
Elementos pasivos en GUIs
Probablemente uno de los elementos gráficos más sencillos y más habituales son las
etiquetas de texto (javax.swing.JLabel). A continuación tienes el código de una GUI
muy sencilla que muestra una ventana con una etiqueta de texto:
import javax.swing.JFrame;
import javax.swing.JPanel;
import javax.swing.JLabel;

class HelloWorldGUI {

  public static void main(String args[]) {
    JFrame frame = new JFrame("HelloWorldGUI window title");
    frame.setDefaultCloseOperation(JFrame.EXIT_ON_CLOSE);

    JPanel contentPane = (JPanel) frame.getContentPane();
    JLabel label = new JLabel("Hello World!");
    contentPane.add(label);

    frame.setSize(100, 50);
    frame.setVisible(true);
  }
}
-
Compila y prueba este programa
-
Enumera en un papel los nombres de las clases de los objetos que se crean en una ejecución de este programa.
-
Abre la API de Java y localiza dichas clases. ¿En qué paquete las puedes encontrar?
-
Enumera los métodos que se invocan en una ejecución de este programa, acompáñalos de las clases a las que pertenecen (siguiendo su estructura de herencia). No olvides los constructores.
-
Intenta explicar, por escrito, qué hace cada una de las líneas de este código. Cuando acabes todos los ejercicios de esta práctica vuelve a este apartado y repasa tus notas a ver si puedes añadir algo nuevo.
-
Escribe un programa
HelloWorldGUIBigigual queHelloWorldGUIdonde la ventana sea 4 veces más grande. -
Escribe un programa
HelloWorldGUIColorigual queHelloWorldGUIdonde el fondo de la etiqueta tenga color azul.
Soluciones
Las soluciones para los apartados 1-5 no se muestran aquí. Preguntad al profesor.
import javax.swing.JFrame;
import javax.swing.JPanel;
import javax.swing.JLabel;

class HelloWorldGUI {

  public static void main(String args[]) {
    JFrame frame = new JFrame("HelloWorldGUI window title");
    frame.setDefaultCloseOperation(JFrame.EXIT_ON_CLOSE);

    JPanel contentPane = (JPanel) frame.getContentPane();
    JLabel label = new JLabel("Hello World!");
    contentPane.add(label);

    frame.setSize(100, 50);
    frame.setVisible(true);
  }
}
La solución del apartado 6 es la siguiente:
import javax.swing.JFrame;
import javax.swing.JPanel;
import javax.swing.JLabel;

class HelloWorldGUIBig {
  public static void main(String args[]) {
    JFrame frame;
    JPanel contentPane;
    JLabel label;

    frame = new JFrame("HelloWorldGUIBig");
    frame.setDefaultCloseOperation(JFrame.EXIT_ON_CLOSE);

    contentPane = (JPanel) frame.getContentPane();
    label = new JLabel("Hello World!");
    contentPane.add(label);

    frame.setSize(400, 200);
    frame.setVisible(true);
  }
}
El apartado 7 se resuelve con el siguiente código:
import javax.swing.JFrame;
import javax.swing.JPanel;
import javax.swing.JLabel;
import java.awt.Color;

class HelloWorldGUIColor {
  public static void main(String args[]) {
    JFrame frame;
    JPanel contentPane;
    JLabel label;

    frame = new JFrame("HelloWorldGUIColor");
    frame.setDefaultCloseOperation(JFrame.EXIT_ON_CLOSE);

    contentPane = (JPanel) frame.getContentPane();
    label = new JLabel("Hello World!");
    label.setOpaque(true);
    label.setBackground(Color.BLUE);
    contentPane.add(label);

    frame.setSize(100, 50);
    frame.setVisible(true);
  }
}
1.2.
Introducción a la gestión de eventos
El código que se muestra a continuación construye una interfaz gráfica muy simple,
que contiene un botón (javax.swing.JButton) que puede ser pulsado. El resto de
los elementos de la interfaz los deberías conocer ya.
import javax.swing.JFrame;
import javax.swing.JPanel;
import javax.swing.JButton;
import java.awt.BorderLayout;

class Simple00GUIEn {

  private static final String FRAME_TITLE = "Simple00GUI";
  private static final String BUTTON_TEXT = "Click me!";

  private void createGUI() {
    JFrame.setDefaultLookAndFeelDecorated(true);
    JFrame frame = new JFrame(FRAME_TITLE);
    frame.setDefaultCloseOperation(JFrame.EXIT_ON_CLOSE);
    JPanel contentPane = (JPanel) frame.getContentPane();
    JButton button = new JButton(BUTTON_TEXT);
    contentPane.add(button, BorderLayout.CENTER);
    frame.pack();
    frame.setVisible(true);
  }

  public static void main(String args[]) {
    Simple00GUIEn p = new Simple00GUIEn();
    p.createGUI();
  }
}
-
Compila y prueba este programa. ¿Qué ocurre al pulsar sobre el botón?
-
Abre el API de Java y localiza la clase
JButton. Este punto ya lo deberías haber realizado por iniciativa propia, esto es un mero recordatorio. -
Escribe un programa
Simple01GUI, basado enSimple00GUI, en el que al pulsar el botón se muestre un texto por salida estándar. Te será útil el métodojavax.swing.AbstractButton.addActionListener(ActionListener l), así como el siguiente esqueleto de código.import java.awt.event.ActionListener; import java.awt.event.ActionEvent; class ButtonActionListenerEn implements ActionListener { public void actionPerformed(ActionEvent e) { } } -
Escribe un programa
Simple02GUI, basado enSimple00GUI, en el que al pulsar el botón se modifique el texto que aparece sobre el mismo. -
Escribe un programa
Simple03GUI, basado enSimple00GUI, que además contenga unJLabelcuyo texto aparecerá con la primera pulsación del botón. -
Escribe un programa
TwoButtonsque contenga dos botones A y B. Al comenzar el programa, sólamente A estará activado. Al pulsar sobre el botón A, éste se desactivará y será B el que pase a estar activo. El comportamiento de B será simétrico al de A. Aquí tienes un ejemplo: TwoButtons.class.(Nota: Este ejemplo está compuesto de una única clase, pero tu programa no tiene por qué seguir este patrón. Elige la forma de trabajo que más te guste.) -
Con respecto al apartado anterior, si lo hiciste con una única clase, repite el ejercicio utilizando varias clases. Si por el contrario utilizaste varias clases, haz las modificaciones necesarias para que sólo haya una clase (un único .class resultante de la compilación).
Soluciones
Las soluciones se pueden ver en los siguientes listados:
Simple01GUIEn
import javax.swing.JFrame;
import javax.swing.JPanel;
import javax.swing.JButton;
import java.awt.BorderLayout;

class Simple01GUIEn {

  private static final String FRAME_TITLE = "Simple00GUIEn";
  private static final String BUTTON_TEXT = "Click me!";

  private void createGUI() {
    JFrame.setDefaultLookAndFeelDecorated(true);
    JFrame frame = new JFrame(FRAME_TITLE);
    frame.setDefaultCloseOperation(JFrame.EXIT_ON_CLOSE);
    JPanel contentPane = (JPanel) frame.getContentPane();
    JButton button = new JButton(BUTTON_TEXT);
    button.addActionListener(new ButtonActionListenerEn());
    contentPane.add(button, BorderLayout.CENTER);
    frame.pack();
    frame.setVisible(true);
  }

  public static void main(String args[]) {
    Simple01GUIEn p = new Simple01GUIEn();
    p.createGUI();
  }
}
import java.awt.event.ActionListener;
import java.awt.event.ActionEvent;

class ButtonActionListenerEn implements ActionListener {

  private static final String MSG = "Hello World!";

  public void actionPerformed(ActionEvent e) {
    System.out.println(MSG);
  }

}
Simple02GUIEn
import javax.swing.JFrame;
import javax.swing.JPanel;
import javax.swing.JButton;
import javax.swing.JLabel;
import java.awt.GridLayout;
import java.awt.Color;

class Simple02GUIEn {

  private static final String FRAME_TITLE = "Simple02GUIEn";
  private static final String BUTTON_TEXT = "Click me!";
  private static final String LABEL_TEXT = "The button's text change!";

  private void createGUI() {
    JFrame.setDefaultLookAndFeelDecorated(true);
    JFrame frame = new JFrame(FRAME_TITLE);
    frame.setDefaultCloseOperation(JFrame.EXIT_ON_CLOSE);
    JPanel contentPane = (JPanel) frame.getContentPane();
    contentPane.setLayout(new GridLayout(2, 1));

    JLabel label = new JLabel(LABEL_TEXT, JLabel.CENTER);
    label.setOpaque(true);
    label.setBackground(Color.GREEN);
    contentPane.add(label);

    JButton button = new JButton(BUTTON_TEXT);
    button.addActionListener(new ButtonActionListenerEn(button));
    contentPane.add(button);

    frame.pack();
    frame.setVisible(true);
  }

  public static void main(String args[]) {
    Simple02GUIEn p = new Simple02GUIEn();
    p.createGUI();
  }
}
import java.awt.event.ActionListener;
import java.awt.event.ActionEvent;
import javax.swing.JLabel;
import javax.swing.JButton;
import java.awt.Color;

class ButtonActionListenerEn implements ActionListener {

  private static final String BUTTON_TEXT = "Click me!";

  private JButton button;

  public ButtonActionListenerEn(JButton button) {
    this.button = button;
  }

  public void actionPerformed(ActionEvent e) {
    System.out.println(Thread.currentThread().getName()
        + ": Changing the button's text.");
    if (button.getText().equals(BUTTON_TEXT)) {
      button.setText("Change me!");
    } else {
      button.setText(BUTTON_TEXT);
    }
  }

}
Simple03GUI
import javax.swing.JFrame;
import javax.swing.JPanel;
import javax.swing.JButton;
import javax.swing.JLabel;
import java.awt.GridLayout;
import java.awt.Color;

class Simple03GUIEn {

  private static final String FRAME_TITLE = "Simple03GUIEn";
  private static final String BUTTON_TEXT = "Click me!";

  private void createGUI() {
    JFrame.setDefaultLookAndFeelDecorated(true);
    JFrame frame = new JFrame(FRAME_TITLE);
    frame.setDefaultCloseOperation(JFrame.EXIT_ON_CLOSE);
    JPanel contentPane = (JPanel) frame.getContentPane();
    contentPane.setLayout(new GridLayout(2, 1));

    JLabel label = new JLabel("", JLabel.CENTER);
    label.setOpaque(true);
    label.setBackground(Color.GREEN);
    label.setVisible(false);
    contentPane.add(label);

    JButton button = new JButton(BUTTON_TEXT);
    button.addActionListener(new ButtonActionListenerEn(label));
    contentPane.add(button);

    frame.pack();
    frame.setVisible(true);
  }

  public static void main(String args[]) {
    Simple03GUIEn p = new Simple03GUIEn();
    p.createGUI();
  }
}
import java.awt.event.ActionListener;
import java.awt.event.ActionEvent;
import javax.swing.JLabel;
import javax.swing.JButton;
import java.awt.Color;

class ButtonActionListenerEn implements ActionListener {

  private static final String LABEL_TEXT = "The label's text appears!";

  private JLabel label;

  public ButtonActionListenerEn(JLabel label) {
    this.label = label;
  }

  public void actionPerformed(ActionEvent e) {
    System.out.println(Thread.currentThread().getName()
        + ": Showing the label's text.");
    label.setText(LABEL_TEXT);
    label.setVisible(true);
  }

}
TwoButtons en una única clase (Descargalo aquí)
import java.awt.Component;
import java.awt.event.ActionEvent;
import java.awt.event.ActionListener;
import java.lang.Object;
import javax.swing.JButton;
import javax.swing.JFrame;
import javax.swing.JPanel;

public class TwoButtons implements ActionListener {

  private static final String FRAME_TITLE = "TwoButtons";
  private static final String BUTTON_TEXT = "Click me!";
  private JButton pushed;
  private JButton disabled;

  TwoButtons() {
    pushed = null;
    disabled = null;
    return;
  }

  private void createGUI() {
    JFrame.setDefaultLookAndFeelDecorated(true);
    JFrame frame = new JFrame("TwoButtons");
    frame.setDefaultCloseOperation(JFrame.EXIT_ON_CLOSE);
    JPanel contentPane = (JPanel) frame.getContentPane();

    JButton left = new JButton("Click me!");
    JButton rigth = new JButton("Click me!");
    pushed = rigth;
    disabled = left;

    left.addActionListener(this);
    rigth.addActionListener(this);

    contentPane.add(left, "West");
    contentPane.add(rigth, "East");

    frame.pack();
    frame.setVisible(true);
    return;
  }

  private void changeButtonRoles() {
    JButton temp = pushed;
    pushed = disabled;
    disabled = temp;
    return;
  }

  public void enableDisable() {
    pushed.setEnabled(false);
    disabled.setEnabled(true);
    return;
  }

  public void actionPerformed(ActionEvent e) {
    changeButtonRoles();
    enableDisable();
    return;
  }

  public static void main(String[] aStringArray_0) {
    TwoButtons t = new TwoButtons();
    t.createGUI();
    t.enableDisable();
    return;
  }
}
TwoButtons en varias clases(Descargalo aquí)
import java.awt.Component;
import java.lang.Object;
import javax.swing.JButton;
import javax.swing.JFrame;
import javax.swing.JPanel;

public class TwoButtons {

  private static final String FRAME_TITLE = "TwoButtons";
  private static final String BUTTON_TEXT = "Click me!";

  private void createGUI() {
    JFrame.setDefaultLookAndFeelDecorated(true);
    JFrame frame = new JFrame("TwoButtons");
    frame.setDefaultCloseOperation(JFrame.EXIT_ON_CLOSE);
    JPanel contentPane = (JPanel) frame.getContentPane();

    JButton left = new JButton("Click me!");
    JButton rigth = new JButton("Click me!");
    rigth.setEnabled(false);
    left.setEnabled(true);

    ButtonActionListener buttonListener = new ButtonActionListener(rigth, left);
    left.addActionListener(buttonListener);
    rigth.addActionListener(buttonListener);

    contentPane.add(left, "West");
    contentPane.add(rigth, "East");

    frame.pack();
    frame.setVisible(true);
    return;
  }

  public static void main(String[] aStringArray_0) {
    TwoButtons t = new TwoButtons();
    t.createGUI();
    return;
  }
}
-----------------
import javax.swing.JButton;
import java.awt.event.ActionEvent;
import java.awt.event.ActionListener;

public class ButtonActionListener implements ActionListener {
  private JButton pushed;
  private JButton disabled;

  ButtonActionListener(JButton b1, JButton b2) {
    pushed = b1;
    disabled = b2;
  }

  private void changeButtonRoles() {
    JButton temp = pushed;
    pushed = disabled;
    disabled = temp;
    return;
  }

  public void enableDisable() {
    pushed.setEnabled(false);
    disabled.setEnabled(true);
    return;
  }

  public void actionPerformed(ActionEvent e) {
    changeButtonRoles();
    enableDisable();
    return;
  }
}
1.3.
Tres En Raya básico (I)
Este ejercicio vamos a practicar con un ejemplo completo de implementación de una Interfaz Gráfica de Usuario (GUI) que integre la correspondiente Gestión de Eventos (Event Management) asociada a los elementos gráficos que la componen.
Para todo esto, nos basaremos en el famoso juego del “Tres en Raya”. Según la Wikipedia, “el tres en línea, también conocido como Tres En Raya, juego del gato, tatetí, triqui, tres en gallo, michi o la vieja, es un juego de lápiz y papel entre dos jugadores: O y X, que marcan los espacios de un tablero de 3×3 alternadamente. Un jugador gana si consigue tener una línea de tres de sus símbolos: la línea puede ser horizontal, vertical o diagonal.”
Para simular el tablero del juego, usaremos los siguientes
elementos gráficos del paquete javax.Swing que se citan a
continuación:
-
Los espacios del tablero se simulan mediante el uso de botones de tipo
javax.swing.JButtoncon una imagen(javax.swing.ImageIcon)asociada a los mismos.-
Si el espacio esta libre, sin haber sido marcado, el botón no tendrá asociada ninguna imagen.
-
El marcado del espacio se simula asociando al botón una imagen vinculada, respectivamente, al turno de cada jugador: O y X
Las imágenes se muestran a continuación para poder descargarlas:


Nota
A la hora de inicalizar un objeto
ImageIconcon la ruta del fichero de la imagen del botón, asegúrate de que dicha ruta sea correcta para que pueda mostrarse al usuario.
-
-
El tablero se modelará mediante un elemento contenedor de tipo
javax.swing.Jpanely cuyo layout asociado será de tipojava.awt.GridLayout(3x). Se usará también un array bidimensional (3x3) para almacenar los botones asociados a las distintas casillas.-
El array bidimensional 3x3 se rellena con botones del tipo anterior.
-
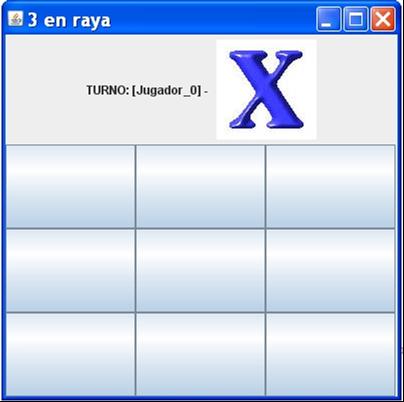
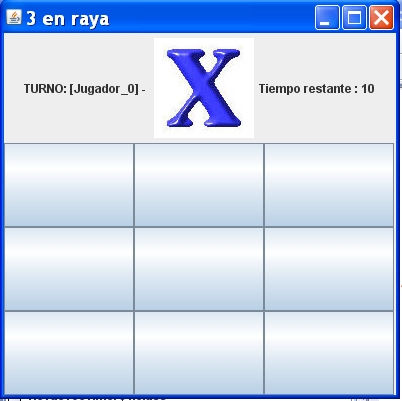
La siguiente imagen muestra la ventana inicial del juego
constituida por los siguientes paneles (JPanel): un panel
superior (panel_info) con información sobre el turno del
jugador actual; y un panel central (panel_board) que contiene
inicialmente el array de botones sin ninguna imagen asociada, es decir, el
tablero inicial del juego sin marcar y preparado para empezar a
jugar:
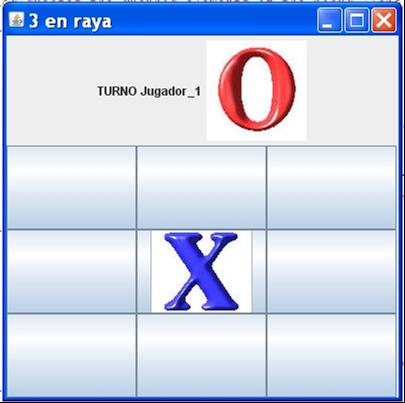
A medida que se suceden los turnos de los jugadores, cada jugador “marca el espacio" al pulsar el botón correspondiente de la misma. Para simular el marcado del espacio, se cambia la imagen asociada al botón con el símbolo de cada jugador como puede observarse en la siguiente imagen:
En el caso de que algún espacio no se pueda marcar (bien porque no le queden símbolos restantes al jugador o por no estar en el turno correspondiente), debe aparecer un mensaje advirtiendo del error cometido.
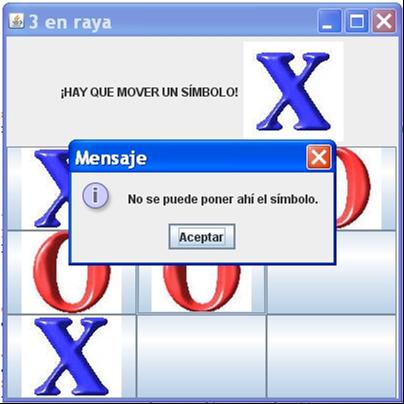
Por último, si se consiguen las tres en raya, se muestra un mensaje de enhorabuena al jugador como se muestra en la figura.

La clase TicTacToeButton.
Vamos a programar la clase TicTacToeButton
que representa el espacio o
casilla que puede marcar cada jugador. Para simular
el marcado de la misma, el botón actualizará la imagen asociada al mismo
en función de si está libre (no tiene imagen asociada) o marcada (con la
imagen asociada al jugador de cada turno). Para ello, la clase contiene
los siguientes atributos:
-
Un atributo entero
(turnPlayer)para almacenar el turno del jugador correspondiente y representa el estado del espacio (casilla). -
Tres constantes enteras
(FREE, PLAYER_1,
        PLAYER_2)
que indican los posibles estados correspondientes asociados al botón . -
Un array de imágenes
(javax.swing.ImageIcon[])que almacena los símbolos de los respectivos jugadores: O y X.
Descarga el esqueleto de la clase del siguiente enlace TicTacToeButton.java e implementa los siguientes métodos de la clase que se citan a continuación:
-
El constructor de la clase
public
        TicTacToeButton()
que inicializa el botón y lo deja en estado libre(FREE), es decir, sin turno de jugador y, por consiguiente, sin ninguna imagen asociada al mismo. -
El método
public void setPlayer(int
        newPlayer)
que actualiza el estado del botón con el turno del nuevo jugador y su imagen correspondiente.
Prueba el funcionamiento de la clase ejecutando el método
main de la misma y pasándole como argumento uno cualquiera de
los posibles estados del botón (FREE(-1), PLAYER_1(0),
PLAYER_2(1)) para ver que el comportamiento del mismo es
correcto.
La clase TicTacToe.
En este apartado no se va a programar nada, simplemente se
pretende observar cómo se ha construido el Interfaz
Gráfico correspondiente al tablero del "Tres en Raya". Descarga
el esqueleto de la clase TicTacToe del siguiente enlace
TicTacToe.java y
observa los siguiente métodos que permiten construir el Interfaz
Gráfico.
Nota
El método que realiza la configuración de la gestión de
eventos, private void createEventListener(), se ha dejado
vacío hasta el siguiente apartado.
-
El método
private void buildGraphicElements()inicializa todos los elementos gráficos necesarios para construir el Interfaz Gráfico (etiquetas y array de botones) y los establece en el estado inicial libre(FREE), tal y como se muestra en el enunciado del ejercicio. -
El método
private void
        addElementsToContainers()
añade respectivamente los elementos gráficos anteriores a sus correspondientes paneles (información y tablero). Por último, añade dichos paneles respectivamente al contenedor de alto nivel de la ventana del GUI.
Para hacer visible la ventana con el GUI del juego en el
estado inicial del mismo, ejecuta el método main de la misma.
Dicho método se encarga de crearla, inicializarla y hacerla visible
invocando a los anteriores métodos.
La clase TicTacToeButtonListener.
En este apartado vamos a "dar vida" a nuestro juego para que sea capaz de interaccionar con el usuario de acuerdo a la lógica del juego. Todo eso se consigue con el diseño e implementación de la “Gestión de Eventos” asociada al GUI, para lo cual, normalmente necesitamos hacer las siguientes tareas:
-
Decidir qué tipo de componentes gráficos de nuestro Interfaz Gráfico constituyen la "Fuente de Eventos" (Event Source), es decir, qué componentes serán los generadores de eventos que queramos a tratar posteriormente. En nuestro caso, dichos componentes gráficos serán los botones
(JButton)del tablero que representan los espacios o casillas del mismo. -
Decidir qué tipos de eventos, de los que pueden generar los anteriores componentes, van a ser posteriormente tratados por el/los escuchador/es correspondiente/s. En este caso, todos los eventos que vamos a tratar son del tipo
ActionEventy que está relacionado con el evento de pulsación del botón por parte del usuario. -
Definir el número de Clases Escuchadoras (Listeneres) que van a reaccionar a los anteriores eventos. El número de clases es variable, puede ser una o varias en función de la estrategia de diseño para la Gestión de Eventos. En este caso, implementaremos una única clase escuchadora,
TicTacToeButtonListener, que va a ser la responsable de gestionar cualquier evento de tipoActionEventque se generen al pulsar cualquier botón (TicTacToeButton) . Para conseguirlo, la clase escuchadora debe implementar la interfaz(interface)correspondiente asociado a dicho tipo de evento, en nuestro caso se trata de la interfazActionListener. -
Para cada elemento gráfico que actúe como una "Fuente de Eventos" (Event Source) que quieran ser tratados posteriormente por una o varias clase Escuchadoras
(Listeners), se necesita realizar un registro previo de dicha/s clase/s en el componente. En nuestro caso, una vez creado el objeto de la clase escuchadora(TicTacToeButtonListener), este se ha de registrar respectivamente en cada uno de los botones del tablero mediante la invocación al métodopublic void addActionListener(ActionListener l). -
Por último, implementar la clase Escuchadora de los eventos,
TicTacToeButtonListener, esto es, tanto el constructor como el/los método/s correspondiente/s de la interfaz o interfaces que se implementen en la/s clase/s escuchadoras de acuerdo a la anterior estrategia elegida (punto 2). Es en estos métodos es donde ser realiza la auténtica gestión de eventos asociada del GUI.
En relación a los tres primeros puntos, (1. 2. y 3.), todo
se resume en que los únicos componentes gráficos que van a actuar como
fuentes de eventos serán los botones (JButton) del tablero.
Respecto a los distintos tipos de eventos posibles, únicamente van a
gestionarse eventos de tipo ActionEvent que se generen tras
las pulsaciones de dichos botones. Se ha decidido crear una única clase escuchadora, la clase,
TicTacToeButtonListener, que se encarga de gestionar los
eventos del tipo ActionEvent implementando su interfaz
asociada, ActionListener y, por consiguiente, el siguiente
único método de la misma: public void actionPerformed(ActionEvent
event).
En este apartado del ejercicio, implementaremos el código de los dos últimos puntos (4. y 5.):
-
El punto 4. se implementa mediante el método
private void createEventListener()de la claseTicTacToe. Se encarga de realizar la creación y el posterior registro del escuchador para cada elemento gráfico generador de eventos, es decir, para cada botón del tablero.Programa el código del método en el esqueleto de la clase
TicTacToede acuerdo a lo especificado en el punto. -
El punto 5. nos obliga a implementar el método public void actionPerformed(ActionEvent event) en la clase escuchadora
TicTacToeButtonListener. Es, precisamente, en este método donde se realiza la verdadera Gestión de Eventos del GUI. El evento generado se pasa al método a través del parámetro event del mismo.
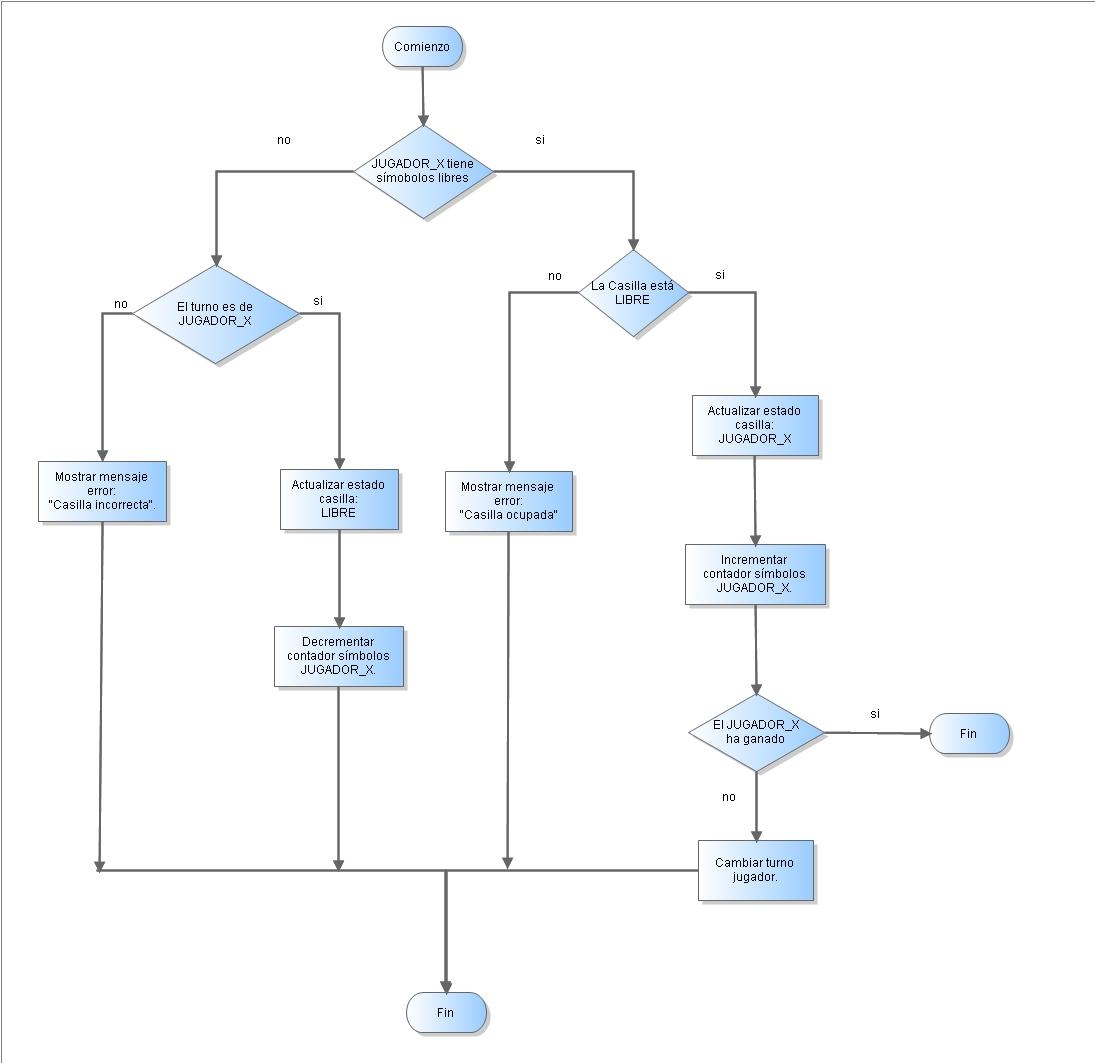
El diagrama de flujo correspondiente
al método public void actionPerformed(ActionEvent
event) se muestra a continuación. Está particularizado para un
jugador "JUGADOR_X" y representa el flujo del
programa que se realiza cuando dicho jugador pulsa el botón
correspondiente al espacio que quiere marcar. En el
diagrama de flujo, básicamente se realizan tres comprobaciones previas
antes de verificar si el jugador ha ganado la partida:
-
Primero, se comprubeba si al jugador le quedan símbolos libres para poder marcar el espacio (recuerda, el jugador posee solo tres símbolos para usar).
-
En caso afirmativo, se comprueba si el espacio esta libre (FREE) o no y, en cuyo caso se debe mostrar el mensaje de error correspondiente.
-
En caso negativo, se comprueba si el turno actual pertenece al jugador
"PLAYER_X"o no antes de actualizar el símbolo de la casilla y, en cuyo caso se debe mostrar el mensaje de error correspondiente.
-
Nota
Para mostrar una Ventana de Diálogo
con el mensaje de error del usuario, puedes usar el método estático
showMessageDialog
de la clase javax.swing.JOptionPane.
Soluciones
El código con la solución del ejercicio se muestra a continuación:
import javax.swing.*;
import javax.swing.event.*;
import java.awt.*;
import java.awt.event.*;
/**
* This class implements a square of the board as a button. The button has to
* mantain the correct state (the owner's player) and has to change it according
* to the game's rules.
*/
public class TicTacToeButton extends JButton {
// State variables
/**
* Indicates if square is free, it can be occupied by the other player.
*/
public static final int FREE = -1;
/**
* The square is occupied by player #1
*/
public static final int PLAYER_1 = 0;
/**
* The square is occupied by player #2
*/
public static final int PLAYER_2 = 1;
/**
* This array stores the buttons' images.
*/
public static Icon[] images;
// Static constructor
static {
// Creating the images' array to make them accesible.
images = new ImageIcon[] { new ImageIcon("img/x.jpg"),
new ImageIcon("img/o.jpg") };
}
/**
* The state of the button, that is, the owner's player.
*/
private int ownerPlayer;
/**
* Default constructor.
*/
public TicTacToeButton() {
// First of all, always we call to the base class constructor (always)
super();
// Adjusting the state to FREE
setPlayer(FREE);
}
/**
* Return whether the button's state is free or not.
*
* @return true if it is free, or false if it is owned by a player.
*/
public boolean isFree() {
return ownerPlayer == FREE;
}
/**
* This method updates the state of the button with the new player that is
* passed as parameter.
*
* @param newPlayer
* The new player that has "marked" the square, that is, that has
* clicked the botton.
*/
public void setPlayer(int newPlayer) {
// Update the new player
ownerPlayer = newPlayer;
// Changing the button's icon according to the state.
if (ownerPlayer == FREE) {
// calling the super class method to delete the button's image.
setIcon(null);
} else {
// calling the super class method to update the button's image.
setIcon(images[ownerPlayer]);
}
}
/**
* Returns the button's state, that is, the owner of the square(button).
*
* @return The button's owner player.
*/
public int getPlayer() {
return ownerPlayer;
}
/**
* The main method of the class
*
* @param args
* The parameters' array.
*/
public static void main(String[] args) {
int player = 0;
// Create a window. Use JFrame since this window will include
// lightweight components.
JFrame frame = new JFrame("Demo TicTacToeButton");
JLabel lTitle = new JLabel();
// Create a button.
TicTacToeButton bTic = new TicTacToeButton();
// Adjusting the state according to the argument
if (args.length == 1) {
player = Integer.parseInt(args[0]);
if (player == 0 || player == 1 || player == -1)
bTic.setPlayer(Integer.parseInt(args[0]));
else {
javax.swing.JOptionPane.showMessageDialog(frame,
"Valor Argumento incorrecto.Los unicos posibles son -1, 0 o 1.");
System.exit(0);
}
}
switch (player) {
case -1:
lTitle.setText("Casilla LIBRE (FREE) -> Estado -1");
break;
case 0:
lTitle.setText("Casilla JUGADOR_1 (PLAYER_1) -> Estado 0");
break;
case 1:
lTitle.setText("Casilla JUGADOR_2 (PLAYER_2) -> Estado 1");
break;
default:
break;
}
// Registering a Listener to react to the window closing event
// We use an anonymous class to implement the interface's method.
frame.addWindowListener(new WindowAdapter() {
public void windowClosing(WindowEvent e) {
System.exit(0);
}
});
// Finally, we set the size of the window and we show it
frame.getContentPane().add(bTic, BorderLayout.CENTER);
frame.getContentPane().add(lTitle, BorderLayout.NORTH);
frame.setSize(300, 300);
frame.setVisible(true);
}
}
import javax.swing.*;
import javax.swing.event.*;
import java.awt.*;
import java.awt.event.*;
/**
* This class models the TicTacToe game. It extends from JFrame and builds the
* board as a bidimentional matrix of Buttons. Event Management is achived in a
* centralized manner by using a single Event Listener.
*
* @author DIT - UC3M
* @version 1.0
*/
public class TicTacToe extends JFrame {
// NON GRAPHIC ATTRIBUTES DECLARATION
/**
* Window's title.
*/
public static final String TITTLE = "3 en raya";
/**
* The size of the board (CONSTANT).
*/
public static final int BOARD_SIZE = 3;
/**
* This array stores the number (counter) of figures placed by each player.
*/
public static int[] placedFigures = { 0, 0 };
/**
* Indicates the actual turn's player.
*/
private int turnPlayer;
// GRAPHIC ATTRIBUTES DECLARATION
/**
* Label that shows the actual turn player.
*/
private JLabel actualTurn;
/**
* Label that shows the image of the actual turn player.
*
*/
private JLabel labelFigure;
/**
* Button's bidimensional array that represents the main board of the game.
*/
private TicTacToeButton[][] board;
/**
* El panel que contiene el tablero con los botones (casillas).
*/
private JPanel panel_board;
/**
* El panel que contiene las etiquetas (JLabels).
*/
private JPanel panel_info;
// Window's dimension
/**
* Window's width (CONSTANT).
*/
public static final int WIDTH = 400;
/**
* Window's height (CONSTANT).
*/
static final int HEIGHT = 400;
/**
* Class Constructor.
*
* @param title
* The game's title..
*/
public TicTacToe(String title) {
super(title);
// Building graphics elements of the game (using an auxiliary method).
buildGraphicElements();
// Adding graphic elements to the containers (using an auxiliary method).
addElementsToContainers();
// Creating the Event Listener (using an auxiliary method).
createEventListener();
// The rest of the initialization process.
turnPlayer = TicTacToeButton.PLAYER_1;
// After all, we should pack previously to show.
pack();
}
/**
* This method creates the graphic elements of the board (labels, buttons,
* panels, etc...)
*/
private void buildGraphicElements() {
// A descriptive label showing the corresponding turn.
actualTurn = new JLabel("TURNO: [Jugador_" + TicTacToeButton.PLAYER_1
+ "] - ");
// Starting with Player #1
labelFigure = new JLabel(TicTacToeButton.images[TicTacToeButton.PLAYER_1]);
// Creating the main buttons' array to add to the panel later.
board = new TicTacToeButton[BOARD_SIZE][BOARD_SIZE];
for (int f = 0; f < BOARD_SIZE; f++) {
for (int c = 0; c < BOARD_SIZE; c++) {
board[f][c] = new TicTacToeButton();
}
}
}
/**
* This auxiliary method adds elements to its containers respectively.
*/
private void addElementsToContainers() {
// Creating the panels to add elements
// The main board panel
panel_board = new JPanel();
panel_board.setLayout(new GridLayout(BOARD_SIZE, BOARD_SIZE));
// adding buttons to the container
for (int f = 0; f < BOARD_SIZE; f++) {
for (int c = 0; c < BOARD_SIZE; c++) {
panel_board.add(board[f][c]);
}
}
// The info's panel ("Flowlayout" as default)
panel_info = new JPanel();
// Adding the actual turn player info and the associated image.
panel_info.add(actualTurn);
panel_info.add(labelFigure);
// Finally, adding the previous panels to the main panel container
// ("BorderLayout" as default)
// We add the info's panel to the North and the board's panel to the South.
// But first of all, we have to obtain a reference to the Main's Window
// panel container.
Container content = getContentPane();
content.add(panel_info, BorderLayout.NORTH);
content.add(panel_board, BorderLayout.CENTER);
}
/**
* This auxiliary method configures the Event Listener for the graphic
* elements (Buttons) .
*/
private void createEventListener() {
// First of all, Create the Listener that manages the events of the buttons
TicTacToeButtonListener butListen = new TicTacToeButtonListener(this);
// Finally, registering the Listener on each element source of events, in
// this case,
// each button.
for (int f = 0; f < BOARD_SIZE; f++)
for (int c = 0; c < BOARD_SIZE; c++)
board[f][c].addActionListener(butListen);
}
/**
* This auxiliary method changes the turn of the player.
*/
private void changeTurn() {
if (turnPlayer == TicTacToeButton.PLAYER_1) {
turnPlayer = TicTacToeButton.PLAYER_2;
actualTurn.setText("TURNO Jugador_" + TicTacToeButton.PLAYER_2);
labelFigure.setIcon(TicTacToeButton.images[TicTacToeButton.PLAYER_2]);
} else {
turnPlayer = TicTacToeButton.PLAYER_1;
actualTurn.setText("TURNO Jugador_" + TicTacToeButton.PLAYER_1);
labelFigure.setIcon(TicTacToeButton.images[TicTacToeButton.PLAYER_1]);
}
}
/**
* This auxiliary method test if the owner has won the game.
*/
private boolean hasWon(int player) {
int countFigures = 0;
// Test if there's a line of figures of the player
// Horizontal lines
for (int i = 0; i < BOARD_SIZE; i++) {
countFigures = 0;
for (int j = 0; j < BOARD_SIZE; j++) {
if (board[i][j].getPlayer() == player) {
countFigures++;
if (countFigures == BOARD_SIZE) {
return true;
}
}
}
}
// Vertical lines
for (int i = 0; i < BOARD_SIZE; i++) {
countFigures = 0;
for (int j = 0; j < BOARD_SIZE; j++) {
if (board[j][i].getPlayer() == player) {
countFigures++;
if (countFigures == BOARD_SIZE) {
return true;
}
}
}
}
// First Diagonal
countFigures = 0;
for (int i = 0; i < BOARD_SIZE; i++) {
if (board[i][i].getPlayer() == player) {
countFigures++;
if (countFigures == BOARD_SIZE) {
return true;
}
}
}
countFigures = 0;
// First Diagonal
for (int i = 0; i < BOARD_SIZE; i++) {
if (board[BOARD_SIZE - (i + 1)][i].getPlayer() == player) {
countFigures++;
if (countFigures == BOARD_SIZE) {
return true;
}
}
}
return false;
}
/**
* The main method of the class
*
* @param args
* The parameters' array.
*/
public static void main(String[] args) {
// Building a TicTacToe's instance
TicTacToe game = new TicTacToe(TicTacToe.TITTLE);
// Registering a Listener to react to the window closing event
// We use an anonymous class to implement the interface's method.
game.addWindowListener(new WindowAdapter() {
public void windowClosing(WindowEvent e) {
System.exit(0);
}
});
// Finally, we set the size of the window and we show it
game.setSize(WIDTH, HEIGHT);
game.setVisible(true);
}
/**
* This class implements de Listener of events that will be produced by the
* buttons of the main board. The Events will be thrown as ActionEvents and,
* consequentlly, it has to implement the corresponding method of the
* interface ActionListener.
*/
class TicTacToeButtonListener implements ActionListener {
/**
* We need a reference to the frame to access the elements we want to
* change.
*/
private JFrame miFrame;
/**
* Class constructor.
*
* @param frame
* The frame that we need to store so we can acces the elements to
* modify later.
*/
public TicTacToeButtonListener(JFrame frame) {
this.miFrame = frame;
}
/**
* This is the method of the ActionListener interface that has to be
* overwritten.
*
* @param event
* The ActionEvent's event that is thrown when the button is
* clicked.
*/
public void actionPerformed(ActionEvent event) {
// First of all, we have to obtain the reference of the button that has
// been pressed.
TicTacToeButton clickedButton = (TicTacToeButton) event.getSource();
// If the player has still figures left to put (the size of the board)
if (placedFigures[turnPlayer] < BOARD_SIZE) {
// We check if the square is free or not
if (clickedButton.isFree()) {
// We update the state of the square, that is, the button.
clickedButton.setPlayer(turnPlayer);
// Incrementing the counter of placed figures of the player
((TicTacToe) miFrame).placedFigures[turnPlayer]++;
// Check if we have won the game
if (placedFigures[turnPlayer] == BOARD_SIZE) {
// Check if the player has won the game
if (hasWon(turnPlayer)) {
// GREETINGS, THE PLAYER HAS WON THE GAME !!
javax.swing.JOptionPane.showMessageDialog(miFrame,
"ENHORABUENA, JUGADOR_" + turnPlayer + ","
+ "HAS GANADO EL JUEGO !!");
System.exit(0);
}
}
// And, finally, we change the player's turn
changeTurn();
} else {
// We show a Message Dialog with an error message.
javax.swing.JOptionPane.showMessageDialog(miFrame,
"No se puede poner ahi el simbolo.");
}
} else {
// We have no figures left, we must take out one to move it.
actualTurn.setText("HAY QUE MOVER UN SIMBOLO!");
// We have to check whether we are the correct player to take it out
if (clickedButton.getPlayer() == turnPlayer) {
// in that case, the square becomes free
clickedButton.setPlayer(TicTacToeButton.FREE);
// Decrementing the counter of placed figures
((TicTacToe) miFrame).placedFigures[turnPlayer]--;
} else {
// We are not the correct player so we alert.
javax.swing.JOptionPane.showMessageDialog(miFrame,
"No se puede poner ahi el simbolo.");
}
}
}
}
}
.png) 2.
Actividades para casa
2.
Actividades para casa
2.1. Practicar con el Manejador de Ventanas
Un Manejador de Ventanas es un programa que se encarga de controlar las ventanas presentes en un entorno gráfico. Los Manejadores de Ventanas permiten al usuario tratar las ventanas sin necesidad de comunicarse con los programas que las han creado. Así, un Manejador de Ventanas permite al usuario realizar las siguientes operaciones sobre las ventanas de su entorno gráfico: crear y destruir ventanas, mover y redimensionar ventanas, cambiar la ventana activa (selección de foco) y ocultar y hacer reaparecer ventanas ocultas.
Es por eso que los programas que abren ventanas, además de comunicarse con el usuario, tienen que comunicarse con el Manejador de Ventanas, es decir un programa gráfico tendrá que tener las siguientes interfaces de comunicación:
-
Una interfaz para que el usuario se comunique con el programa. Puede ser la entrada estándar y/o botones y otros elementos gráficos que se muestren en la ventana.
-
Una interfaz para que el programa se comunique con el usuario. Puede ser la salida estándar y/o etiquetas de texto y dibujos que pinte en la ventana.
-
Una interfaz para que la ventana se comunique con el manejador de ventanas y viceversa. Por ejemplo, cuando el usuario se comunica con el manejador de ventanas pidiendo que se cierre la ventana (pulsando el botón en forma de aspa de una ventana Windows), el Manejador de Ventanas le pasa el mensaje a la ventana y esta al programa que la controla para que se termine su ejecución.
La mayoría de los entornos gráficos modernos permiten correr sobre ellos diferentes Manejadores de Ventanas, cada uno con diferentes maneras de trabajar, unos más cómodos otros menos, unos más bonitos y otros más toscos. En el sistema operativo Windows, solo utiliza, por defecto, un único Manejador de Ventanas. Probablemente este es el único Manejador de Ventanas que conozcas, pero hay muchos más (cientos).
Normalmente, los Manejadores de Ventanas se comunican con el usuario mediante una serie de decoraciones que añaden a las ventanas (por ejemplo, un borde fino, una barra de título y algunos botones). Estas decoraciones, junto con algunas combinaciones de teclas (Alt-Tab por ejemplo), permiten al usuario mandar instrucciones al Manejador de Ventanas sobre lo que se quiere hacer con sus ventanas (maximizarlas, ocultarlas...).
La clase JFrame tiene una serie de métodos que permiten a la ventana comunicarse
con el Manejador de Ventanas y viceversa:
-
setVisible(boolean b)Por defecto, las nuevas ventanas no se hacen visibles en la pantalla. Utiliza este método para hacer una ventana visible. No lo hagas nada más crearla, probablemente quieras configurar algunos detalles de tu ventana antes de hacerla visible.
-
setLocation(int x, int y)Por defecto, las nuevas ventanas que crees aparecen en la posición (0,0), que es la esquina superior izquierda de la pantalla. Con este método puedes elegir donde quieres que aparezca. El eje x crece hacia la derecha el y hacia abajo
-
setUndecorated(boolean b)Por defecto, el Manejador de Ventanas añade su propia decoración a las ventanas que tú creas (normalmente una barra de título y algunos botones para manejar la ventana), si quieres que no lo haga utiliza este método. Nota: Es ilegal cambiar la decoración de la ventana una vez esta ya ha sido hecha visible.
Nota
Algunos Manejadores de Ventanas, como el de Windows XP se comunican principalmente con el usuario mediante estas decoraciones, si las quitas puede ser difícil para el usuario manejar las ventanas.
-
setExtendedEstate(int state)Las ventanas pueden estar en varios estados dentro del Manejador de Ventanas, pueden estar visibles, iconificadas (ocultas), maximizadas... Utiliza este método para modificar el estado de la ventana. No todos los sistemas admiten todos los estados.
-
setDefaultLookAndFeelDecorated(boolean b)Por defecto, las nuevas ventanas están decoradas según las preferencias del Manejador de Ventanas en que estamos trabajando. Este decorado puede ser sobreescrito por el del "Look and Feel" que hayamos escogido previamente.
-
setDefaultCloseOperation(int operation)Cuando un usuario le pide a su Manejador de Ventanas que cierre una ventana, el Manejador de Ventanas le pide a la ventana que ejecute una cierta operación, normalmente matar el proceso. Mediante este método podemos configurar el comportamiento de nuestra ventana para que realice otras operaciones, por ejemplo ignorar el mensaje o realizar alguna operación alternativa (como mostrar un diálogo de confirmación de cierre)
Para la realización de este ejercicio, realiza las siguientes tareas que se enumeran a continuación:
-
Consulta el API de Java e intenta entender la descripción de cada uno de estos métodos.
-
Escribe un programa
HelloWorldGUIDeafparecido aHelloWorldGUIque ignore el mensaje de cierre del Manejador de Ventanas. Pruébalo. ¿Cómo se puede cerrar la ventana ahora? -
Escribe un programa
HelloWorldGUIUndecoratedparecido aHelloWorldGUIque no utilice ninguna decoración del Manejador de Ventanas. -
Escribe un programa
HelloWorldGUIDecoratedparecido aHelloWorldGUIque utilice el "Look and Feel" por defecto de Java en vez de el del manejador de ventanas que estés utilizando.
Soluciones
Las soluciones se pueden ver en los siguientes listados:
import javax.swing.JFrame;
import javax.swing.JPanel;
import javax.swing.JLabel;

class HelloWorldGUIDeaf {
  public static void main(String args[]) {
    JFrame frame;
    JPanel contentPane;
    JLabel label;

    frame = new JFrame("HelloWorldGUIDeaf");
    frame.setDefaultCloseOperation(JFrame.DO_NOTHING_ON_CLOSE);

    contentPane = (JPanel) frame.getContentPane();
    label = new JLabel("Hello World!");
    contentPane.add(label);

    frame.pack();
    frame.setVisible(true);
  }
}
import javax.swing.JFrame;
import javax.swing.JPanel;
import javax.swing.JLabel;

class HelloWorldGUIUndecorated {
  public static void main(String args[]) {
    JFrame frame;
    JPanel contentPane;
    JLabel label;

    frame = new JFrame("HelloWorldGUIUndecorated");
    frame.setDefaultCloseOperation(JFrame.EXIT_ON_CLOSE);

    contentPane = (JPanel) frame.getContentPane();
    label = new JLabel("Hello World!");
    contentPane.add(label);

    frame.setSize(100, 50);
    frame.setUndecorated(true);
    frame.setVisible(true);
  }
}
import javax.swing.JFrame;
import javax.swing.JPanel;
import javax.swing.JLabel;

class HelloWorldGUIDecorated {
  public static void main(String args[]) {
    JFrame frame;
    JPanel contentPane;
    JLabel label;

    JFrame.setDefaultLookAndFeelDecorated(true);
    frame = new JFrame("HelloWorldGUIDecorated");
    frame.setDefaultCloseOperation(JFrame.EXIT_ON_CLOSE);

    contentPane = (JPanel) frame.getContentPane();
    label = new JLabel("Hello World!");
    contentPane.add(label);

    frame.pack();
    frame.setVisible(true);
  }
}
2.2.
Introducción a los diferentes LayOuts
Normalmente, las interfaces gráficas de un programa contienen un número elevado de componentes, que pueden ser de diferentes tipos. Por ello, hace falta un método para distribuir dichos componentes sobre la ventana que los contiene.
Los diferentes Layouts de Java cubren esta necesidad. A través de políticas estándar de posicionamiento, se indican unas directrices genéricas de forma que
el LayoutManager se encarga de cumplirlas lo más fielmente posible.
Cada JPanel tiene una política de posicionamiento asociada, la cual se puede configurar según la necesidad. En este ejercicio se trabajará con un tipo de Layout denominado BorderLayout (notese que en inglés "border" quiere decir "frontera"),
que además está configurado por defecto en el contentPane de un JFrame.
-
Escribe una primera versión de un programa llamado
CompassSimpleque sea igual queHelloWorldGUIColorpero que muestre la etiqueta en fondo negro, el texto blanco y la ventana de tamaño 400x200. -
Modifica el programa
CompassSimplepara que muestre 4 etiquetas:-
Texto: "North", color del fondo: negro, color del texto: blanco
-
Texto: "South", color del fondo: blanco, color del texto: negro
-
Texto: "East", color del fondo: azul, color del texto: rojo
-
Texto: "West", color del fondo: rojo, color del texto: azul
Cada una de ellas debe estar colocada en la ventana según las directrices que marca su texto en un
BorderLayout. No hagas consideraciones estéticas sobre el resultado. Te será útil consultar en el API de Java información sobre métodos y atributos de las siguientes clases.java.awt.Container //especialmente las variantes del método add() java.awt.BorderLayout //tiene una serie de interesantes atributos estáticosMediante el manejador de ventanas, modifica el tamaño de la ventana y comprueba cómo las etiquetas se posicionan correctamente de forma automática.
-
-
Cuando creas una etiqueta, ¿qué alineado horizontal tiene por defecto su texto? ¿y vertical?
Solución
Las soluciones se pueden ver en los siguientes listados:
import javax.swing.JFrame;
import javax.swing.JPanel;
import javax.swing.JLabel;
import java.awt.Color;
import java.awt.BorderLayout;
import java.awt.Frame;

class CompassSimple {
  public static void main(String args[]) {
    JFrame frame;
    JPanel contentPane;
    JLabel label;

    frame = new JFrame("CompassSimple");
    frame.setDefaultCloseOperation(JFrame.EXIT_ON_CLOSE);
    contentPane = (JPanel) frame.getContentPane();

    label = new JLabel("North");
    label.setOpaque(true);
    label.setBackground(Color.BLACK);
    label.setForeground(Color.WHITE);
    contentPane.add(label, BorderLayout.NORTH);

    label = new JLabel("South");
    label.setOpaque(true);
    label.setBackground(Color.WHITE);
    label.setForeground(Color.BLACK);
    contentPane.add(label, BorderLayout.SOUTH);

    label = new JLabel("East");
    label.setOpaque(true);
    label.setBackground(Color.BLUE);
    label.setForeground(Color.RED);
    contentPane.add(label, BorderLayout.EAST);

    label = new JLabel("West");
    label.setOpaque(true);
    label.setBackground(Color.RED);
    label.setForeground(Color.BLUE);
    contentPane.add(label, BorderLayout.WEST);

    if (frame.getToolkit().isFrameStateSupported(Frame.MAXIMIZED_BOTH))
      frame.setExtendedState(Frame.MAXIMIZED_BOTH);
    else
      frame.setSize(frame.getToolkit().getScreenSize());
    frame.setVisible(true);
  }
}
2.3. Practicar diferentes Layouts
Partiremos del ejercio de introducción de los diferentes tipos de Layouts. Para ello, realiza los siguientes apartados que se enuncian a continuación:
-
Escribe un programa
CompassBetterque centre el texto de las etiquetas en cada etiqueta y tengan todas color de fondo negro y texto blanco. -
Ya sabes que las etiquetas pueden contener texto, pero también pueden contener imágenes. Escribe un programa
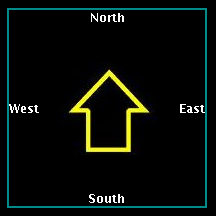
CompassMuchBetterparecido aCompassBetterpero que incluya una etiqueta con estaimagenen el centro. Ten cuidado con el path de la imagen.El resultado debería ser algo como esto (los bordes son la decoración del manejador de ventanas donde se tomó la imagen, en tu sistema pueden ser diferentes):
-
El método
JFrame.pack()calcula el tamaño mínimo de una ventana para que pueda acomodar todos los componentes que contiene de forma razonable y llama aJFrame.setSize()sobre ese tamaño. Escribe un programaCompassMuchBetterSmallparecido aCompassMuchBetterpero que la ventana que muestre sea del tamaño mínimo necesario. -
Escribe un programa
HelloWorldGUICenteredparecido aHelloWorldGUIque muestre su ventana centrada en la pantalla y con el tamaño calculado automáticamente.Sugerencia
El tamaño de la pantalla se puede obtener mediante
JFrame.getToolkit().getScreenSize()y el tamaño de la ventana se puede obtener medianteJFrame.getWidth()yJFrame.getHeight(). -
Escribe un método
centerAndShowFrame(JFrame frame, double xScale, double yScale)que centre una ventana en la pantalla, la redimensione al tamaño mínimo necesario escalado por los valores dexScaleeyScaley la haga visible. Utiliza dicho método en un programaCompassMuchBetterCentered. Puedes encapsular este método en una claseFrameUtilitiesy utilizarlo para el resto de los programas que hagas en el futuro.
Soluciones
Las soluciones se pueden ver en los siguientes listados:
BorderTest
import javax.swing.JFrame;
import javax.swing.JPanel;
import javax.swing.JLabel;
import java.awt.Color;
import java.awt.GridLayout;
import javax.swing.border.TitledBorder;
import javax.swing.border.LineBorder;

class BorderTest {
  private static final int NUM_ROWS = 20;

  private static boolean isEven(int i) {
    if (i % 2 == 0)
      return true;
    else
      return false;
  }

  public static void main(String args[]) {
    JFrame frame;
    JPanel contentPane;
    JLabel label;

    JFrame.setDefaultLookAndFeelDecorated(true);
    frame = new JFrame("BorderTest");
    frame.setDefaultCloseOperation(JFrame.EXIT_ON_CLOSE);
    contentPane = (JPanel) frame.getContentPane();
    contentPane.setLayout(new GridLayout(NUM_ROWS, 1));
    contentPane.setBorder(new TitledBorder(new LineBorder(Color.BLACK, 1),
        "contentPane(GridLayout)"));

    for (int i = 0; i < NUM_ROWS; i++) {
      label = new JLabel("label " + i);
      label.setOpaque(true);
      if (isEven(i)) {
        label.setBackground(Color.WHITE);
        label.setForeground(Color.BLACK);
      } else {
        label.setBackground(Color.BLACK);
        label.setForeground(Color.WHITE);
      }
      label.setHorizontalAlignment(JLabel.CENTER);
      label.setVerticalAlignment(JLabel.CENTER);
      contentPane.add(label);
    }

    FrameUtilities.centerAndShowFrame(frame, 3.0, 1.2);
  }
}
CompassBetter
import javax.swing.JFrame;
import javax.swing.JPanel;
import javax.swing.JLabel;
import java.awt.Color;
import java.awt.BorderLayout;
import java.awt.Frame;

class CompassBetter {
  public static void main(String args[]) {
    JFrame frame;
    JPanel contentPane;
    JLabel label;

    frame = new JFrame("CompassBetter");
    frame.setDefaultCloseOperation(JFrame.EXIT_ON_CLOSE);
    contentPane = (JPanel) frame.getContentPane();

    label = new JLabel("North");
    label.setOpaque(true);
    label.setBackground(Color.BLACK);
    label.setForeground(Color.WHITE);
    label.setHorizontalAlignment(JLabel.CENTER);
    label.setVerticalAlignment(JLabel.CENTER);
    contentPane.add(label, BorderLayout.NORTH);

    label = new JLabel("South");
    label.setOpaque(true);
    label.setBackground(Color.BLACK);
    label.setForeground(Color.WHITE);
    label.setHorizontalAlignment(JLabel.CENTER);
    label.setVerticalAlignment(JLabel.CENTER);
    contentPane.add(label, BorderLayout.SOUTH);

    label = new JLabel("East");
    label.setOpaque(true);
    label.setBackground(Color.BLACK);
    label.setForeground(Color.WHITE);
    label.setHorizontalAlignment(JLabel.CENTER);
    label.setVerticalAlignment(JLabel.CENTER);
    contentPane.add(label, BorderLayout.EAST);

    label = new JLabel("West");
    label.setOpaque(true);
    label.setBackground(Color.BLACK);
    label.setForeground(Color.WHITE);
    label.setHorizontalAlignment(JLabel.CENTER);
    label.setVerticalAlignment(JLabel.CENTER);
    contentPane.add(label, BorderLayout.WEST);

    if (frame.getToolkit().isFrameStateSupported(Frame.MAXIMIZED_BOTH))
      frame.setExtendedState(Frame.MAXIMIZED_BOTH);
    else
      frame.setSize(frame.getToolkit().getScreenSize());
    frame.setVisible(true);
  }
}
CompassMuchBetter
import javax.swing.JFrame;
import javax.swing.JPanel;
import javax.swing.JLabel;
import java.awt.Color;
import java.awt.BorderLayout;
import java.awt.Frame;
import javax.swing.ImageIcon;

class CompassMuchBetter {
  public static void main(String args[]) {
    JFrame frame;
    JPanel contentPane;
    JLabel label;
    ImageIcon arrow;

    frame = new JFrame("CompassMuchBetter");
    frame.setDefaultCloseOperation(JFrame.EXIT_ON_CLOSE);
    contentPane = (JPanel) frame.getContentPane();

    label = new JLabel("North");
    label.setOpaque(true);
    label.setBackground(Color.BLACK);
    label.setForeground(Color.WHITE);
    label.setHorizontalAlignment(JLabel.CENTER);
    label.setVerticalAlignment(JLabel.CENTER);
    contentPane.add(label, BorderLayout.NORTH);

    label = new JLabel("South");
    label.setOpaque(true);
    label.setBackground(Color.BLACK);
    label.setForeground(Color.WHITE);
    label.setHorizontalAlignment(JLabel.CENTER);
    label.setVerticalAlignment(JLabel.CENTER);
    contentPane.add(label, BorderLayout.SOUTH);

    label = new JLabel("East");
    label.setOpaque(true);
    label.setBackground(Color.BLACK);
    label.setForeground(Color.WHITE);
    label.setHorizontalAlignment(JLabel.CENTER);
    label.setVerticalAlignment(JLabel.CENTER);
    contentPane.add(label, BorderLayout.EAST);

    label = new JLabel("West");
    label.setOpaque(true);
    label.setBackground(Color.BLACK);
    label.setForeground(Color.WHITE);
    label.setHorizontalAlignment(JLabel.CENTER);
    label.setVerticalAlignment(JLabel.CENTER);
    contentPane.add(label, BorderLayout.WEST);

    arrow = new ImageIcon("./arrow.jpg");
    label = new JLabel(arrow);
    label.setOpaque(true);
    label.setBackground(Color.BLACK);
    label.setHorizontalAlignment(JLabel.CENTER);
    label.setVerticalAlignment(JLabel.CENTER);
    contentPane.add(label, BorderLayout.CENTER);

    frame.setSize(200, 200);
    frame.setVisible(true);
  }
}
CompassMuchBetterCentered
import javax.swing.JFrame;
import javax.swing.JPanel;
import javax.swing.JLabel;
import java.awt.Color;
import java.awt.BorderLayout;
import java.awt.Frame;
import javax.swing.ImageIcon;

class CompassMuchBetterCentered {
  public static void main(String args[]) {
    JFrame frame;
    JPanel contentPane;
    JLabel label;
    ImageIcon arrow;

    frame = new JFrame("CompassMuchBetter");
    frame.setDefaultCloseOperation(JFrame.EXIT_ON_CLOSE);
    contentPane = (JPanel) frame.getContentPane();

    label = new JLabel("North");
    label.setOpaque(true);
    label.setBackground(Color.BLACK);
    label.setForeground(Color.WHITE);
    label.setHorizontalAlignment(JLabel.CENTER);
    label.setVerticalAlignment(JLabel.CENTER);
    contentPane.add(label, BorderLayout.NORTH);

    label = new JLabel("South");
    label.setOpaque(true);
    label.setBackground(Color.BLACK);
    label.setForeground(Color.WHITE);
    label.setHorizontalAlignment(JLabel.CENTER);
    label.setVerticalAlignment(JLabel.CENTER);
    contentPane.add(label, BorderLayout.SOUTH);

    label = new JLabel("East");
    label.setOpaque(true);
    label.setBackground(Color.BLACK);
    label.setForeground(Color.WHITE);
    label.setHorizontalAlignment(JLabel.CENTER);
    label.setVerticalAlignment(JLabel.CENTER);
    contentPane.add(label, BorderLayout.EAST);

    label = new JLabel("West");
    label.setOpaque(true);
    label.setBackground(Color.BLACK);
    label.setForeground(Color.WHITE);
    label.setHorizontalAlignment(JLabel.CENTER);
    label.setVerticalAlignment(JLabel.CENTER);
    contentPane.add(label, BorderLayout.WEST);

    arrow = new ImageIcon("./arrow.jpg");
    label = new JLabel(arrow);
    label.setOpaque(true);
    label.setBackground(Color.BLACK);
    label.setHorizontalAlignment(JLabel.CENTER);
    label.setVerticalAlignment(JLabel.CENTER);
    contentPane.add(label, BorderLayout.CENTER);

    FrameUtilities.centerAndShowFrame(frame, 1.2, 1.2);
  }
}
CompassMuchBetterSmall
import javax.swing.JFrame;
import javax.swing.JPanel;
import javax.swing.JLabel;
import java.awt.Color;
import java.awt.BorderLayout;
import java.awt.Frame;
import javax.swing.ImageIcon;

class CompassMuchBetterSmall {
  public static void main(String args[]) {
    JFrame frame;
    JPanel contentPane;
    JLabel label;
    ImageIcon arrow;

    frame = new JFrame("CompassMuchBetter");
    frame.setDefaultCloseOperation(JFrame.EXIT_ON_CLOSE);
    contentPane = (JPanel) frame.getContentPane();

    label = new JLabel("North");
    label.setOpaque(true);
    label.setBackground(Color.BLACK);
    label.setForeground(Color.WHITE);
    label.setHorizontalAlignment(JLabel.CENTER);
    label.setVerticalAlignment(JLabel.CENTER);
    contentPane.add(label, BorderLayout.NORTH);

    label = new JLabel("South");
    label.setOpaque(true);
    label.setBackground(Color.BLACK);
    label.setForeground(Color.WHITE);
    label.setHorizontalAlignment(JLabel.CENTER);
    label.setVerticalAlignment(JLabel.CENTER);
    contentPane.add(label, BorderLayout.SOUTH);

    label = new JLabel("East");
    label.setOpaque(true);
    label.setBackground(Color.BLACK);
    label.setForeground(Color.WHITE);
    label.setHorizontalAlignment(JLabel.CENTER);
    label.setVerticalAlignment(JLabel.CENTER);
    contentPane.add(label, BorderLayout.EAST);

    label = new JLabel("West");
    label.setOpaque(true);
    label.setBackground(Color.BLACK);
    label.setForeground(Color.WHITE);
    label.setHorizontalAlignment(JLabel.CENTER);
    label.setVerticalAlignment(JLabel.CENTER);
    contentPane.add(label, BorderLayout.WEST);

    arrow = new ImageIcon("./arrow.jpg");
    label = new JLabel(arrow);
    label.setOpaque(true);
    label.setBackground(Color.BLACK);
    label.setHorizontalAlignment(JLabel.CENTER);
    label.setVerticalAlignment(JLabel.CENTER);
    contentPane.add(label, BorderLayout.CENTER);

    frame.pack();
    frame.setVisible(true);
  }
}
HelloWorldGUICentered
import javax.swing.JFrame;
import javax.swing.JPanel;
import javax.swing.JLabel;
import java.awt.Dimension;

class HelloWorldGUICentered {
  public static void main(String args[]) {
    JFrame frame;
    JPanel contentPane;
    JLabel label;
    Dimension screenDim;
    int screenWidth, screenHeight;
    int frameWidth, frameHeight;

    frame = new JFrame("HelloWorldGUIiCentered");
    frame.setDefaultCloseOperation(JFrame.EXIT_ON_CLOSE);
    screenDim = frame.getToolkit().getScreenSize();
    screenWidth = (int) screenDim.getWidth();
    screenHeight = (int) screenDim.getHeight();

    contentPane = (JPanel) frame.getContentPane();
    label = new JLabel("Hello World!");
    contentPane.add(label);

    frame.pack();
    frameWidth = frame.getWidth();
    frameHeight = frame.getHeight();
    frame.setLocation(screenWidth / 2 - frameWidth / 2, screenHeight / 2
        - frameHeight / 2);
    frame.setVisible(true);
  }
}
FrameUtilities
import javax.swing.JFrame;
import java.awt.Dimension;

class FrameUtilities {
  public static void centerAndShowFrame(JFrame frame, double xScale,
      double yScale) {
    Dimension screen;
    int screenWidth, screenHeight;
    int frameWidth, frameHeight;

    screen = frame.getToolkit().getScreenSize();
    screenWidth = (int) screen.getWidth();
    screenHeight = (int) screen.getHeight();

    frame.pack();
    frameWidth = frame.getWidth();
    frameHeight = frame.getHeight();
    frame.setSize((int) (frameWidth * xScale), (int) (frameHeight * yScale));
    frameWidth = frame.getWidth();
    frameHeight = frame.getHeight();
    frame.setLocation(screenWidth / 2 - frameWidth / 2, screenHeight / 2
        - frameHeight / 2);
    frame.setVisible(true);
  }
}
2.4.
Tres En Raya con contador de tiempo (II)
Para mejorar nuestros conocimientos sobre el modelo de
Gestión de Eventos en Java, vamos a proponer el
siguiente ejercicio para hacer en casa. Nos basaremos en el código del GUI
del Tres En Raya que hemos programado en la sesión de
laboratorio y vamos a añadir una nueva funcionalidad que permita controlar
el tiempo disponible de cada turno para cada jugador del juego. Es por ello
que incorporaremos un nuevo componente que proporciona la librería gráfica
de Java (javax.swing) que actua como un
"temporizador".
El componente al que hacemos referencia está implementado en
la clase javax.swing.Timer
y, básicamente, genera eventos del tipo ActionEvent a
intervalos determinados constantes y configurables previamente. La forma de
gestionar los eventos de este componente se integra en el "Modelo
General de Delegación de Gestión de Eventos"
de Java que, recordemos, se basa en la existencia de tres clases de
objetos:
-
Un conjunto de Fuentes de Eventos (Source Events) que generan eventos de algún tipo como consecuencia de las acciones del usuario al interaccionar con ellos.
-
Un conjunto de Eventos que pueden organizarse en una jerarquía de clases en base a la información almacenada y el origen diverso de los mismos. Por ejemplo, el tipo
ActionEventpara acciones sobre un componente; el tipoMouseEventpara movimientos de ratón; el tipoKeyEventpara pulsaciones del teclado, etc… -
Un conjunto de Escuchadores (Listeners) que reaccionan ante los eventos que generan las anteriores fuentes en base a los distintos tipos de eventos a los que estén subscritos. Para ello, deben implementar la interfaz asociada a cada tipo de evento que quieran gestionar:
ActionListenerpara eventos de tipoActionEvent;MouseListenerpara eventos de tipoMouseEvent, etc..
Este modelo tiene muchas ventajas: es entendible, flexible, extensible y robusto. Una buena prueba de esto es lo relativamente sencillo que va a resultar la incorporación de código con lógica adicional de Gestión de Eventos a nuestro GUI del Tres en Raya. Para ello, vamos a hacer la analogía correspondiente de la Gestion de Eventos asociada al nuevo componente que integraremos en nuestra aplicación
-
La Fuente de Eventos será el componente Timer (
javax.swing.Timer). -
El tipo de Evento que se genera y que va a tratarse es del tipo
ActionEvent. -
La clase Escuchadora (
TimeListener), tiene que implementar la interfaz asociada al tipo del Evento:ActionListener.
A continuación, se muestra una imagen con la pantalla inicial en la que se muestra la etiqueta con información del contador de tiempo restante del turno del jugador en el panel superior de información (10 segundos en este juego):
El contador de tiempo empieza a descontar segundos hasta que se acaba el tiempo del turno del jugador, en cuyo caso, se muestra la ventana de diálogo con el mensaje de error correspondiente al usuario.
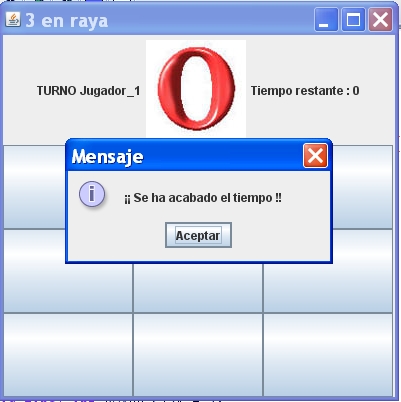
Tras pulsar el botón de Aceptar, se cambia el turno del jugador y se pone el contador de tiempo al valor inicial, tras lo cual, empezará a descontar segundos de nuevo.
Partiendo del código fuente del ejercicio del Tres En Raya de laboratorio que has implementado previamente, realiza las siguientes tareas sobre el mismo para conseguir la incorporación del contador de tiempo:
-
Añade los siguientes atributos a la clase TicTacToe que serán necesarios para integrar el contador de tiempo:
-
Una etiqueta (
Jlabel) que contiene el texto con la información el tiempo restante del turno. -
Una constante entera (
final static int) que representa el máximo tiempo para cada turno. -
Una referencia al objeto Timer (
javax.swing.Timer) que será el contador de tiempo.
-
-
Implementa la clase
TimeListenterque actua como clase Escuchadora de los eventos del objeto contador de tiempo.-
Añade un atributo que sea una referencia a la ventana principal del juego (
Jframe) y que se inicializará en el constructor de la clase. -
Añade otro atributo entero estático que almacenará el número de segundos restantes del turno del jugador.
-
Implementa el método
public void
          actionPerformed(ActionEvent event)
que se ejecutará periódicamente por el objetoTimer. Dicho método decrementará el contador de segundos y, en caso de que dicho valor llegue a cero, mostrará el mensaje de error correspondiente al usuario. Por último, cambiará el turno del juego.
-
-
Crea una instancia del objeto
Timeren el constructor de la claseTicTacToepara que el tiempo restante del turno comience a descontar desde ese momento.-
Como argumento del constructor, pasa una referencia del objeto de la clase Escuchadora
TimeListenerinicializado con la referencia de la ventana del juego, es decir, conthis.
-
-
Por último, modifica el método que sirve para cambiar el turno del jugador,
public void changeTurn(), para que ajuste el valor del contador estático de segundos de la clase Escuchadora (TimeListener) a cero. De esa manera, el contador empezará a descontar el tiempo disponible del nuevo turno del jugador.
Soluciones
El código con la solución del ejercicio se muestra a continuación:
<xi:include></xi:include>
import javax.swing.*;
import javax.swing.event.*;
import java.awt.*;
import java.awt.event.*;

/**
 * This class models the TicTacToe game. It extends from JFrame and builds the
 * board as a bidimentional matrix of Buttons. Event Management is achived in a
 * centralized manner by using a single Event Listener.
 *
 * @author DIT - UC3M
 * @version 1.0
 */
public class TicTacToeTimer extends JFrame {

  // NON GRAPHIC ATTRIBUTES DECLARATION
  /**
   * Window's title.
   */
  public static final String TITTLE = "3 en raya";

  /**
   * The size of the board (CONSTANT).
   */
  public static final int BOARD_SIZE = 3;

  /**
   * This array stores the number (counter) of figures placed by each player.
   */
  public static int[] placedFigures = { 0, 0 };

  /**
   * Indicates the actual turn's player.
   */
  private int turnPlayer;

  // GRAPHIC ATTRIBUTES DECLARATION

  /**
   * Label that shows the actual turn player.
   */
  private JLabel actualTurn;

  /**
   * Label that shows the image of the actual turn player.
   *
   */
  private JLabel labelFigure;

  /**
   * Button's bidimensional array that represents the main board of the game.
   */
  private TicTacToeButton[][] board;

  /**
   * El panel que contiene el tablero con los botones (casillas).
   */
  private JPanel panel_board;

  /**
   * El panel que contiene las etiquetas (JLabels).
   */
  private JPanel panel_info;

  // Window's dimension

  /**
   * Window's width (CONSTANT).
   */
  public static final int WIDTH = 500;

  /**
   * Window's height (CONSTANT).
   */
  static final int HEIGHT = 500;

  /**
   * Maximum time for each turn (miliseconds)
   */
  static final int MAX_TURN_TIME = 10000;

  /**
   * Label that holds the turn's time remaining.
   */
  public JLabel labelTimer;

  /**
   * The timer.
   */
  public Timer t;

  /**
   * Class Constructor.
   *
   * @param title
   *          The game's title..
   */
  public TicTacToeTimer(String title) {

    super(title);

    // Building graphics elements of the game (using an auxiliary method).
    buildGraphicElements();

    // Adding graphic elements to the containers (using an auxiliary method).
    addElementsToContainers();

    // Creating the Event Listener (using an auxiliary method).
    createEventListener();

    // The rest of the initialization process.
    turnPlayer = TicTacToeButton.PLAYER_1;

    // After all, we should pack previously to show.
    pack();

    // Now we create the Timer object
    t = new Timer(1000, new TimerListener(this));

    t.start();

  }

  /**
   * This method creates the graphic elements of the board (labels, buttons,
   * panels, etc...)
   */
  private void buildGraphicElements() {

    // A descriptive label showing the corresponding turn.
    actualTurn = new JLabel("TURNO: [Jugador_" + TicTacToeButton.PLAYER_1
        + "] - ");

    // A label to show the time remaining
    labelTimer = new JLabel("Tiempo restante : ");

    // Starting with Player #1
    labelFigure = new JLabel(TicTacToeButton.images[TicTacToeButton.PLAYER_1]);

    // Creating the main buttons' array to add to the panel later.
    board = new TicTacToeButton[BOARD_SIZE][BOARD_SIZE];
    for (int f = 0; f < BOARD_SIZE; f++) {
      for (int c = 0; c < BOARD_SIZE; c++) {
        board[f][c] = new TicTacToeButton();
      }
    }

  }

  /**
   * This auxiliary method adds elements to its containers respectively.
   */
  private void addElementsToContainers() {

    // Creating the panels to add elements
    // The main board panel
    panel_board = new JPanel();
    panel_board.setLayout(new GridLayout(BOARD_SIZE, BOARD_SIZE));

    // adding buttons to the container
    for (int f = 0; f < BOARD_SIZE; f++) {
      for (int c = 0; c < BOARD_SIZE; c++) {
        panel_board.add(board[f][c]);
      }
    }

    // The info's panel ("Flowlayout" as default)
    panel_info = new JPanel();
    // Adding the actual turn player info and the associated image.
    panel_info.add(actualTurn);
    panel_info.add(labelFigure);
    // Adding the label with the time remaining
    panel_info.add(labelTimer);

    // Finally, adding the previous panels to the main panel container
    // ("BorderLayout" as default)
    // We add the info's panel to the North and the board's panel to the South.
    // But first of all, we have to obtain a reference to the Main's Window
    // panel container.
    Container content = getContentPane();
    content.add(panel_info, BorderLayout.NORTH);
    content.add(panel_board, BorderLayout.CENTER);

  }

  /**
   * This auxiliary method configures the Event Listener for the graphic
   * elements (Buttons) .
   */
  private void createEventListener() {

    // First of all, Create the Listener that manages the events of the buttons
    TicTacToeButtonListener butListen = new TicTacToeButtonListener(this);

    // Finally, registering the Listener on each element source of events, in
    // this case,
    // each button.
    for (int f = 0; f < BOARD_SIZE; f++)
      for (int c = 0; c < BOARD_SIZE; c++)
        board[f][c].addActionListener(butListen);
  }

  /**
   * This auxiliary method changes the turn of the player.
   */
  public void changeTurn() {

    // Reset the second's counter
    TimerListener.sec_count = 0;

    if (turnPlayer == TicTacToeButton.PLAYER_1) {
      turnPlayer = TicTacToeButton.PLAYER_2;
      actualTurn.setText("TURNO Jugador_" + TicTacToeButton.PLAYER_2);
      labelFigure.setIcon(TicTacToeButton.images[TicTacToeButton.PLAYER_2]);

    } else {
      turnPlayer = TicTacToeButton.PLAYER_1;
      actualTurn.setText("TURNO Jugador_" + TicTacToeButton.PLAYER_1);
      labelFigure.setIcon(TicTacToeButton.images[TicTacToeButton.PLAYER_1]);
    }
  }

  /**
   * This auxiliary method test if the owner has won the game.
   */
  private boolean hasWon(int player) {

    int countFigures = 0;
    // Test if there's a line of figures of the player
    // Horizontal lines
    for (int i = 0; i < BOARD_SIZE; i++) {
      countFigures = 0;
      for (int j = 0; j < BOARD_SIZE; j++) {
        if (board[i][j].getPlayer() == player) {
          countFigures++;
          if (countFigures == BOARD_SIZE) {
            return true;
          }
        }
      }
    }

    // Vertical lines
    for (int i = 0; i < BOARD_SIZE; i++) {
      countFigures = 0;
      for (int j = 0; j < BOARD_SIZE; j++) {
        if (board[j][i].getPlayer() == player) {
          countFigures++;
          if (countFigures == BOARD_SIZE) {
            return true;
          }
        }
      }
    }

    // First Diagonal
    countFigures = 0;
    for (int i = 0; i < BOARD_SIZE; i++) {

      if (board[i][i].getPlayer() == player) {
        countFigures++;
        if (countFigures == BOARD_SIZE) {
          return true;
        }
      }
    }

    countFigures = 0;
    // First Diagonal
    for (int i = 0; i < BOARD_SIZE; i++) {
      if (board[BOARD_SIZE - (i + 1)][i].getPlayer() == player) {
        countFigures++;
        if (countFigures == BOARD_SIZE) {
          return true;
        }
      }
    }
    return false;
  }

  /**
   * The main method of the class
   *
   * @param args
   *          The parameters' array.
   */
  public static void main(String[] args) {

    // Building a TicTacToe's instance
    TicTacToeTimer game = new TicTacToeTimer(TicTacToeTimer.TITTLE);

    // Registering a Listener to react to the window closing event
    // We use an anonymous class to implement the interface's method.
    game.addWindowListener(new WindowAdapter() {
      public void windowClosing(WindowEvent e) {
        System.exit(0);
      }
    });

    // Finally, we set the size of the window and we show it
    game.setSize(WIDTH, HEIGHT);
    game.setVisible(true);

  }

  /**
   * This class implements de Listener of events that will be produced by the
   * buttons of the main board. The Events will be thrown as ActionEvents and,
   * consequentlly, it has to implement the corresponding method of the
   * interface ActionListener.
   */
  class TicTacToeButtonListener implements ActionListener {

    /**
     * We need a reference to the frame to access the elements we want to
     * change.
     */
    private JFrame miFrame;

    /**
     * Class constructor.
     *
     * @param frame
     *          The frame that we need to store so we can acces the elements to
     *          modify later.
     */
    public TicTacToeButtonListener(JFrame frame) {

      this.miFrame = frame;

    }

    /**
     * This is the method of the ActionListener interface that has to be
     * overwritten.
     *
     * @param event
     *          The ActionEvent's event that is thrown when the button is
     *          clicked.
     */
    public void actionPerformed(ActionEvent event) {
      // First of all, we have to obtain the reference of the button that has
      // been pressed.
      TicTacToeButton clickedButton = (TicTacToeButton) event.getSource();

      // If the player has still figures left to put (the size of the board)
      if (placedFigures[turnPlayer] < BOARD_SIZE) {

        // We check if the square is free or not
        if (clickedButton.isFree()) {
          // We update the state of the square, that is, the button.
          clickedButton.setPlayer(turnPlayer);

          // Incrementing the counter of placed figures of the player
          ((TicTacToeTimer) miFrame).placedFigures[turnPlayer]++;

          // Check if we have won the game
          if (placedFigures[turnPlayer] == BOARD_SIZE) {
            // Check if the player has won the game
            if (hasWon(turnPlayer)) {
              // ¡¡ GREETINGS, THE PLAYER HAS WON THE GAME !!
              javax.swing.JOptionPane.showMessageDialog(miFrame,
                  "ENHORABUENA, JUGADOR_" + turnPlayer + ","
                      + "HAS GANADO EL JUEGO !!");
              System.exit(0);
            }

          }
          // And, finally, we change the player's turn
          changeTurn();
        } else {
          // We show a Message Dialog with an error message.
          javax.swing.JOptionPane.showMessageDialog(miFrame,
              "No se puede poner ahi el simbolo.");
        }

      } else {
        // We have no figures left, we must take out one to move it.
        actualTurn.setText("HAY QUE MOVER UN SIMBOLO!");
        // We have to check whether we are the correct player to take it out
        if (clickedButton.getPlayer() == turnPlayer) {
          // in that case, the square becomes free
          clickedButton.setPlayer(TicTacToeButton.FREE);

          // Decrementing the counter of placed figures
          ((TicTacToeTimer) miFrame).placedFigures[turnPlayer]--;
        } else {
          // We are not the correct player so we alert.
          javax.swing.JOptionPane.showMessageDialog(miFrame,
              "No se puede poner ahi el simbolo.");
        }
      }
    }
  }

}

class TimerListener implements ActionListener {

  /**
   * We need a reference to the frame to access the elements we want to change.
   */
  private JFrame miFrame;

  /**
   * Class constructor.
   *
   * @param frame
   *          The frame that we need to store so we can acces the elements to
   *          modify later.
   */
  public TimerListener(JFrame frame) {

    this.miFrame = frame;

  }

  // The second's counter
  public static int sec_count = 0;

  /**
   * This is the method of the ActionListener interface that has to be
   * overwritten.
   *
   * @param event
   *          The ActionEvent's event that is thrown when the time period has
   *          been reached.
   */
  public void actionPerformed(ActionEvent event) {

    int temp = TicTacToeTimer.MAX_TURN_TIME - sec_count * 1000;

    if (temp < 0) {
      sec_count = 0;
      javax.swing.JOptionPane.showMessageDialog(miFrame,
          "Se ha acabado el tiempo !!");

      ((TicTacToeTimer) miFrame).changeTurn();

    } else {

      ((TicTacToeTimer) miFrame).labelTimer.setText("Tiempo restante : " + temp
          / 1000);

      sec_count++;
    }

  }

}